'%3e%3cg%20clip-path='url(%23roundHexB)'%3e%3cpath%20fill='%236D5DFC'%20d='M256%2040%20443%20148%20443%20364%20256%20472%2069%20364%2069%20148Z'/%3e%3cpath%20fill='%239C93FB'%20d='M69%20148%20256%2040%20443%20148%20256%20256Z'/%3e%3cpath%20fill='%234A3FD1'%20d='M256%20256%20443%20148%20443%20364%20256%20472Z'/%3e%3c/g%3e%3c!--%20top%20face:%20filled%20round%20magnifier%20--%3e%3cg%20transform='matrix(0.8660254,-0.5,0.8660254,0.5,69,148)'%3e%3cg%20transform='matrix(0.935,0,0,0.935,7.02,7.02)'%3e%3ccircle%20cx='88'%20cy='88'%20r='52'%20fill='%23FFFFFF'/%3e%3ccircle%20cx='88'%20cy='88'%20r='28'%20fill='%239C93FB'/%3e%3cpath%20d='M124%20124%20164%20164'%20stroke='%23FFFFFF'%20stroke-width='26'%20stroke-linecap='round'/%3e%3c/g%3e%3c/g%3e%3cg%20transform='matrix(0.8660254,0.5,0,1,69,148)'%3e%3cpath%20d='M96.1,61.08%20L45.9,128.92%20Q34,145%2054,145%20L162,145%20Q182,145%20170.1,128.92%20L119.9,61.08%20Q108,45%2096.1,61.08%20Z'%20fill='%23FFFFFF'/%3e%3c/g%3e%3c!--%20right%20face:%20filled%20bubble%20--%3e%3cg%20transform='matrix(0.8660254,-0.5,0,1,256,256)'%3e%3cg%20transform='matrix(0.855,0,0,0.855,15.66,15.66)'%3e%3cpath%20d='M60%2042H156a28%2028%200%200%201%2028%2028V158Q184%20168%20174.47%20164.96L124.53%20149.04Q115%20146%20105%20146H60a28%2028%200%200%201-28-28V70a28%2028%200%200%201%2028-28Z'%20fill='%23FFFFFF'/%3e%3c/g%3e%3c/g%3e%3c/g%3e%3c/svg%3e)
 Kui Creations
상품 설명
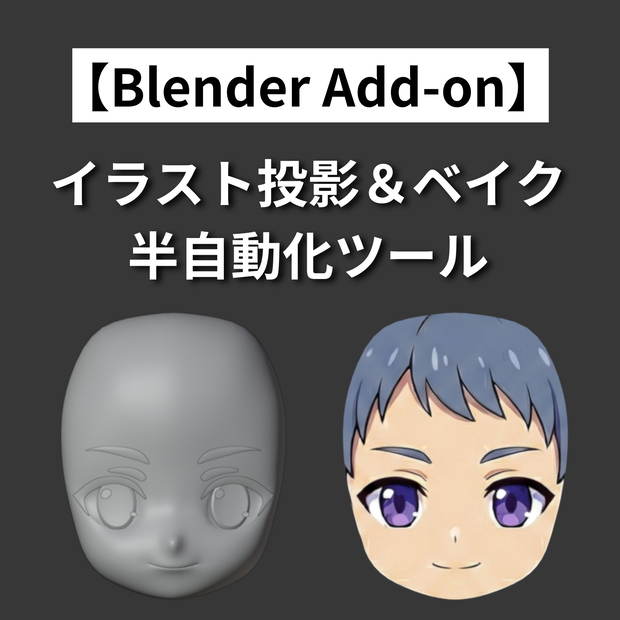
3Dキャラクター制作時において、仮テクスチャーを作成するためのイラスト投影とベイク作業を、半自動化できるアドオンとなります。
■アドオンの使い方
Step 1 : UVMap(.001 / .002)を選択オブジェクトに一括追加
Step 2 : カメラビューへ切り替え・下絵の表示設定
Step 3 : ビューポートレンダリングと自動保存(PNG)
Step 4 : UV投影モディファイアの自動設定
Step 5 : マテリアル+シェーダーノードの自動設定
Step 6 : UV展開(※手動でお願いします)
Step 7 : Cyclesによるベイク実行・自動保存(PNG)
Step 8 : ベイク画像テクスチャへのノード接続を自動設定
各動作詳細は埋め込み動画参照願います。
アドオンで実行されている内容については、各ステップごとに、実行内容とメモしてあります。
■ 動作確認環境
・Blender 4.5.3 LTS
■ インストール方法
1. 購入後、ZIPファイルをダウンロード
2. Blender → 編集 → プリファレンス → アドオン
3. 「ディスクからインストール」から ZIPファイルを選択
■禁止事項
・当データの自作発言、再配布・販売。
・その他、作者が不適切と判断した行為。
■免責事項
当データを使用した際に生じたいかなるトラブルの責任は負いかねます。
This addon semi-automates the illustration projection and baking workflow for creating placeholder textures during 3D character production.
■ How to Use
Step 1 : Add UVMap (.001 / .002) to all selected objects at once
Step 2 : Switch to Camera View and configure reference image display
Step 3 : Viewport rendering and auto-save (PNG)
Step 4 : Auto-configure UV Projection modifier
Step 5 : Auto-configure material and shader nodes
Step 6 : UV Unwrap (※ Please do this manually)
Step 7 : Bake with Cycles and auto-save (PNG)
Step 8 : Auto-configure node connections for the baked image texture
Please refer to the embedded video for details on each operation.
The actions performed by the addon are noted as execution details within each step.
■ How to Use
No special setup needed. Just enable the addon — it works automatically.
Select vertices
Press M → Merge by Distance
Only the merged vertices remain highlighted in orange
■ Tested Environment
・Blender 4.5.3 LTS
■ Installation
1. After purchase, download the ZIP file
2. Blender → Edit → Preferences → Add-ons
3. Click "Install from Disk" and select the ZIP file
■ Prohibited
・Claiming this work as your own, redistributing, or reselling.
・Any other actions deemed inappropriate by the author.
■ Disclaimer
The author is not responsible for any issues arising from the use of this data.
모든 리뷰
더보기리뷰 등록
리뷰를 작성하려면 로그인이 필요합니다.
로그인하고 리뷰 쓰기