'%3e%3cg%20clip-path='url(%23roundHexB)'%3e%3cpath%20fill='%236D5DFC'%20d='M256%2040%20443%20148%20443%20364%20256%20472%2069%20364%2069%20148Z'/%3e%3cpath%20fill='%239C93FB'%20d='M69%20148%20256%2040%20443%20148%20256%20256Z'/%3e%3cpath%20fill='%234A3FD1'%20d='M256%20256%20443%20148%20443%20364%20256%20472Z'/%3e%3c/g%3e%3c!--%20top%20face:%20filled%20round%20magnifier%20--%3e%3cg%20transform='matrix(0.8660254,-0.5,0.8660254,0.5,69,148)'%3e%3cg%20transform='matrix(0.935,0,0,0.935,7.02,7.02)'%3e%3ccircle%20cx='88'%20cy='88'%20r='52'%20fill='%23FFFFFF'/%3e%3ccircle%20cx='88'%20cy='88'%20r='28'%20fill='%239C93FB'/%3e%3cpath%20d='M124%20124%20164%20164'%20stroke='%23FFFFFF'%20stroke-width='26'%20stroke-linecap='round'/%3e%3c/g%3e%3c/g%3e%3cg%20transform='matrix(0.8660254,0.5,0,1,69,148)'%3e%3cpath%20d='M96.1,61.08%20L45.9,128.92%20Q34,145%2054,145%20L162,145%20Q182,145%20170.1,128.92%20L119.9,61.08%20Q108,45%2096.1,61.08%20Z'%20fill='%23FFFFFF'/%3e%3c/g%3e%3c!--%20right%20face:%20filled%20bubble%20--%3e%3cg%20transform='matrix(0.8660254,-0.5,0,1,256,256)'%3e%3cg%20transform='matrix(0.855,0,0,0.855,15.66,15.66)'%3e%3cpath%20d='M60%2042H156a28%2028%200%200%201%2028%2028V158Q184%20168%20174.47%20164.96L124.53%20149.04Q115%20146%20105%20146H60a28%2028%200%200%201-28-28V70a28%2028%200%200%201%2028-28Z'%20fill='%23FFFFFF'/%3e%3c/g%3e%3c/g%3e%3c/g%3e%3c/svg%3e)
 Stein's Lab
상품 설명
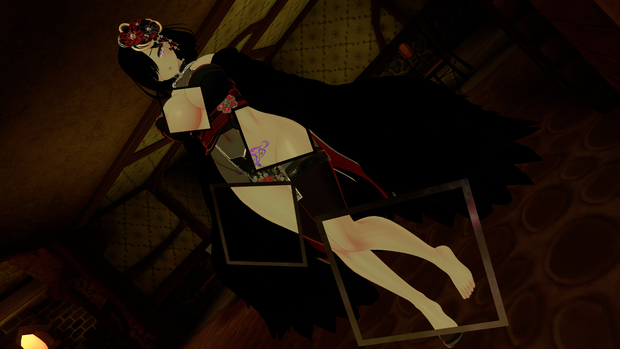
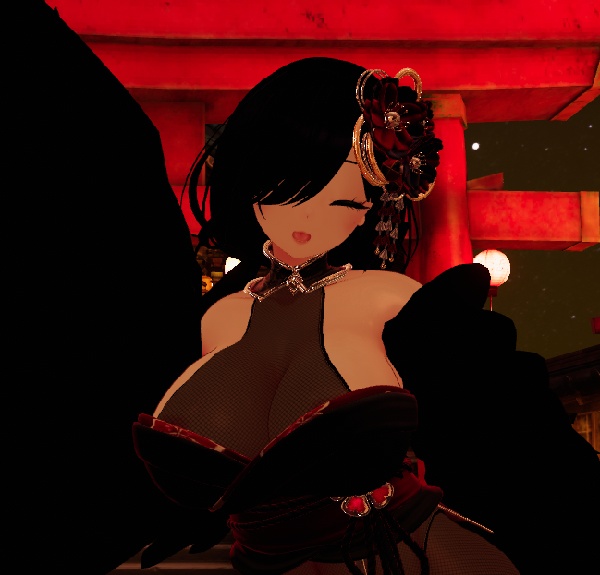
Perfect for taking spicy selfies for your socials!
This gimmick lets you handle and place down astral frames that make certain materials see-through.
See #Regarding RenderQueue below and read the instructions carefully to ensure your avatar is compatible with this gimmick.
Lets ask for permission before using it on others!
あついおはツイとかにとても相応しいよ~
ご覧のギミックで色んなマテリアルを透かせるうぃんどーフレームを持って落とせることができます。
自分のアバターをこのギミックと対応するようにするには下の"#レンダーキューについて"から読んでください。
他人に使う前にちゃんと許可を取りましょうね~
#Installation
1. Install Pre-requisites via VCC
1.1. Modular Avatar (vcc://vpm/addRepo?url=https://vpm.nadena.dev/vpm.json)
1.2. VRCFury (vcc://vpm/addRepo?url=https%3A%2F%2Fvcc.vrcfury.com)
1.3. lilToon (vcc://vpm/addRepo?url=https://lilxyzw.github.io/vpm-repos/vpm.json)
2. Import this Unity Package
3. Drag & Drop the prefab of choice onto your avatar in Hierarchy.
NOTE!
If your outfits use liltoon or another shader with Stencil settings available, use the liltoon prefab (works with Poiyomi too!)
If you want it to work for any and all shaders and outfits using the proper render queue values, use the all-pass prefab (or if you want the gimmick to work for your friends if their renderqueue settings match!) - however this might burn your eyes in some worlds, use with caution.
4. Move the H Frame object to the desired position (and optionally disable it after to hide it from view)
5. If you want to be able to spawn multiple, right-click the main object and select "Prefab > Unpack Completely", duplicate it (ctrl+D), and change the number in the VRCFury Toggles from 1 to 2 and so on to create their own sub-menus automatically.
6. Under Base Setting (or depending on shader), change the Render Queue value of your clothes to 2450 or higher under the material settings.
6.1 (For liltoon prefab only) Also change the clothes' Simple Stencil Settings > Mode and possible Mode (Outline) to Reader, also under Base Setting in liltoon. Leave Ref as 1 or change to a unique value here and on the frame's material to match if you run into problems in specific worlds.
In other shaders such as Poiyomi, this setting is under Rendering > Stencil, change Stencil Reference Value to 1 and Stencil Compare Function at the bottom to NotEqual.
7. Test / Upload and you're done!
(You can change the Pixel size in the material settings)
#インストール
1. 必要なものをVCCから追加
1.1. Modular Avatar (vcc://vpm/addRepo?url=https://vpm.nadena.dev/vpm.json)
1.2. VRCFury (vcc://vpm/addRepo?url=https%3A%2F%2Fvcc.vrcfury.com)
1.3. lilToon (vcc://vpm/addRepo?url=https://lilxyzw.github.io/vpm-repos/vpm.json)
2. ご覧のUnityPackageをインポート
3. 欲しいプレハブ(liltoonかall-pass)をヒエラルキーの中のアバターに引っ張る
ご注意!
服がliltoonかステンシル使えるシェーダーならliltoonのプレハブを使って下さい。
シェーダーによらずRenderQueueが正しければ何にも使えるやつがall-passのプレハブね - あれ使うとワールドによって目が焼けるかもしれないので気を付けてね!
4."H Frame"位置を調整してOFFにする
5. 複数を使いたければ入れた物を右クリックして"Prefab > Unpack Completely"を推して、(ctrl+D)でクローンしてからVRCFury Toggleの数字を増やすだけ、それで新しいメニューが勝手に作られる
6. 服のマテリアルの Render Queue を2450以上に設置して
6.1 (liltoonプレハブのみ) liltoonでは服のマテリアルの基本設定の下の簡易ステンシル設定のModeやMode (輪郭線)をReaderにして下さい。Refは1のままか、ワールドや他の人のアバターによって問題がある場合はこことフレームのマテリアルで同じ数字にしてください。
PoiyomiとかにはRendererの下にあるStencil Reference Valueを1にして、Stencil Compare FunctionをNotEqualにしてね
7. テストやアップロードして終わり。
(ピクセルのサイズはマテリアル設定で変えるます)
#Regarding RenderQueue
Please use Transparent, Cutout or TransClipping etc shader mode for things you want to make disappear when looking through the frame.
The RenderQueue value can be found under each Material's Shader Settings.
The higher the value, the later it will render, similarly the lower the number the earlier it will render.
This gimmick uses value 2449 as base, therefore
Anything you want to make disappear has to be above it (2450+)
Anything you still want to see has to be below it (2448-)
Materials of the same value may act weirdly depending on angle and distance.
If you have a translucent dress and underwear underneath for example, you want to set the underwear to be of lower value than the dress above it.
If you're using the liltoon prefab, only your clothes (and others using the same gimmick) will disappear due to its unique stencil settings, but for all-pass any shaders' clothes set to the right renderqueue will disappear but at the cost of some blinding bloom / HDR accumulation in some worlds.
#レンダーキューについて
まずは消えて欲しい物のマテリアルをTransparentやCutOut、それかTransClipping等々にしてくださいね~
レンダーキューはマテリアルのシェーダー設定にある
上げたらもっと後にレンダーされ、下げたらもっと前にレンダーされる。
このギミックの基本レンダーキューは2449なので
服とかのマテリアルを開いて、数字を2450かその上にする。
お勧め2460以上
肌や髪のマテリアルを開いて、数字を2448かその下にする。
お勧め2440以下
同じ数字を持つマテリアルは角度や距離によって見え方変わるのかもしれませんのでお気を付けて下さい。
半透明なドレスと下着の場合は下着の数字をドレスより下げればよし。
liltoonのプレハブ使ってる方は自分の身、それか同じギミック使っている人服のみが消えるけど、all-pass使う場合はレンダーキューの設定によって他の人の服や色々が消えてしまうのかもしれません。そのせいでワールドによって背景が無ければブルームやHDRが無限に重なって眩しくなるかも。
#Update / アップデート
v5.033 - Fixed position of border being too close to frame center sometimes overlapping the texture on larger avatars
v5.032 - Fixed blinding bloom stack in some worlds on the new liltoon prefab. Divided prefabs to liltoon and all-pass. Removed old Hand prefab, changed border texture, changed xray shader from liltoon to custom lightweight shader for all-pass. Updated documentation to match.
Older version users please read the instructions again!
v4 Plus - Added Pixel filter and Flip option
v3 - Improved Desktop frame some more, if you can't see it make sure it's far enough from your viewpoint.
Try dropping it - if you have to move back to see it you need to move it further in Unity.
v2 - Fixed Desktop frame not showing on local side due to head culling
v1 - Initial Upload
모든 리뷰
더보기리뷰 등록
리뷰를 작성하려면 로그인이 필요합니다.
로그인하고 리뷰 쓰기