'%3e%3cg%20clip-path='url(%23roundHexB)'%3e%3cpath%20fill='%236D5DFC'%20d='M256%2040%20443%20148%20443%20364%20256%20472%2069%20364%2069%20148Z'/%3e%3cpath%20fill='%239C93FB'%20d='M69%20148%20256%2040%20443%20148%20256%20256Z'/%3e%3cpath%20fill='%234A3FD1'%20d='M256%20256%20443%20148%20443%20364%20256%20472Z'/%3e%3c/g%3e%3c!--%20top%20face:%20filled%20round%20magnifier%20--%3e%3cg%20transform='matrix(0.8660254,-0.5,0.8660254,0.5,69,148)'%3e%3cg%20transform='matrix(0.935,0,0,0.935,7.02,7.02)'%3e%3ccircle%20cx='88'%20cy='88'%20r='52'%20fill='%23FFFFFF'/%3e%3ccircle%20cx='88'%20cy='88'%20r='28'%20fill='%239C93FB'/%3e%3cpath%20d='M124%20124%20164%20164'%20stroke='%23FFFFFF'%20stroke-width='26'%20stroke-linecap='round'/%3e%3c/g%3e%3c/g%3e%3cg%20transform='matrix(0.8660254,0.5,0,1,69,148)'%3e%3cpath%20d='M96.1,61.08%20L45.9,128.92%20Q34,145%2054,145%20L162,145%20Q182,145%20170.1,128.92%20L119.9,61.08%20Q108,45%2096.1,61.08%20Z'%20fill='%23FFFFFF'/%3e%3c/g%3e%3c!--%20right%20face:%20filled%20bubble%20--%3e%3cg%20transform='matrix(0.8660254,-0.5,0,1,256,256)'%3e%3cg%20transform='matrix(0.855,0,0,0.855,15.66,15.66)'%3e%3cpath%20d='M60%2042H156a28%2028%200%200%201%2028%2028V158Q184%20168%20174.47%20164.96L124.53%20149.04Q115%20146%20105%20146H60a28%2028%200%200%201-28-28V70a28%2028%200%200%201%2028-28Z'%20fill='%23FFFFFF'/%3e%3c/g%3e%3c/g%3e%3c/g%3e%3c/svg%3e)
 Aurelia Boutique
 Vroid Outfit /Free Hair SuperHero V2
상품 설명
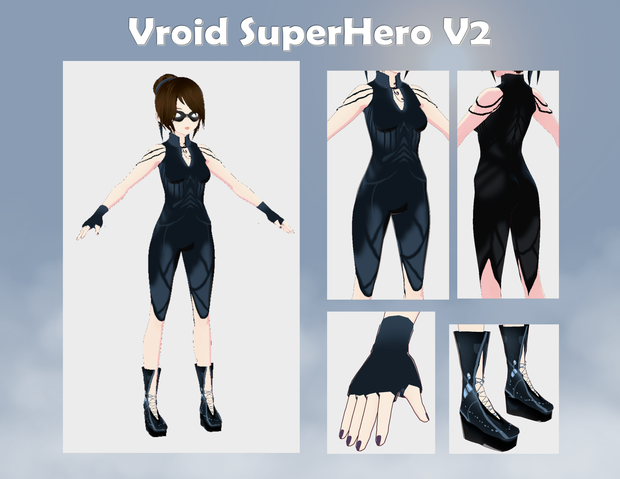
𝐕𝐫𝐨𝐢𝐝 𝐒𝐮𝐩𝐞𝐫𝐇𝐞𝐫𝐨 𝐕𝟐 ✨
Unleash your inner superhero with the Vroid SuperHero V2! 🦸♀️ This 3D model is perfect for virtual creators who want a 𝒔𝒍𝒆𝒆𝒌, 𝒄𝒖𝒔𝒕𝒐𝒎𝒊𝒛𝒂𝒃𝒍𝒆 avatar that’s ready for action. Whether you’re creating for VRChat, animations, or gaming, this design is packed with features and personalization options to make it truly yours. Let’s break it down! 🚀
𝙁𝙚𝙖𝙩𝙪𝙧𝙚𝙨 🌟
𝙊𝙪𝙩𝙛𝙞𝙩 𝘿𝙚𝙨𝙞𝙜𝙣
• 𝗕𝗹𝗮𝗰𝗸 𝗦𝘂𝗽𝗲𝗿𝗵𝗲𝗿𝗼 𝗦𝘂𝗶𝘁: A stylish, form-fitting black outfit designed for agility and flair.
🔹 High neckline with intricate patterns.
🔹 Slit accents on the legs for dynamic movement.
🔹 Fingerless gloves for that edgy look.
• 𝗕𝗼𝗼𝘁𝘀: Futuristic black wedge boots with lace-up details—practical and fashionable! 👢
𝘼𝙘𝙘𝙚𝙨𝙨𝙤𝙧𝙞𝙚𝙨
• 𝗦𝘂𝗽𝗲𝗿𝗵𝗲𝗿𝗼 𝗠𝗮𝘀𝗸: A bold black mask that adds mystery and keeps your identity hidden. You can customize the irises and scleras to suit your vibe! 🕶️
• 𝗚𝗿𝗲𝘆𝘀𝗰𝗮𝗹𝗲 𝗟𝗶𝗽𝘀: Subtle lip textures in greyscale, ready to match any skin tone or aesthetic. 💄
𝙃𝙖𝙞𝙧 𝘿𝙚𝙨𝙞𝙜𝙣
• 𝗘𝗹𝗲𝗴𝗮𝗻𝘁 𝗕𝘂𝗻 𝘄𝗶𝘁𝗵 𝗥𝗶𝗯𝗯𝗼𝗻:
🔹The hairstyle features a classy updo with a flowing ribbon like the free version.
• ✨✨𝗪𝗵𝗮𝘁'𝘀 𝗗𝗶𝗳𝗳𝗲𝗿𝗲𝗻𝘁 𝗳𝗿𝗼𝗺 𝘁𝗵𝗲 𝗳𝗿𝗲𝗲 𝘃𝗲𝗿𝘀𝗶𝗼𝗻?✨✨The layered bangs add depth, while the rich brown color keeps it natural yet striking, framing the face beautifully and adding depth and movement to the design. Perfect for action-packed scenes! 🎀
𝘾𝙪𝙨𝙩𝙤𝙢𝙞𝙯𝙖𝙩𝙞𝙤𝙣 𝙊𝙥𝙩𝙞𝙤𝙣𝙨 🎨
1. 𝗘𝘆𝗲 𝗧𝗲𝘅𝘁𝘂𝗿𝗲𝘀: Replace the default irises and scleras with your own designs to create unique expressions. 👁️
2. 𝗟𝗶𝗽 𝗧𝗲𝘅𝘁𝘂𝗿𝗲𝘀: Use the greyscale lips to seamlessly adapt to your preferred look. 💋
3. 𝗛𝗮𝗶𝗿 𝗠𝗼𝗱𝗶𝗳𝗶𝗰𝗮𝘁𝗶𝗼𝗻𝘀: Adjust the bun or ribbon to suit different themes or moods. ✂️
4. 𝗢𝘂𝘁𝗳𝗶𝘁 & 𝗠𝗮𝘀𝗸 𝗥𝗲𝗰𝗼𝗹𝗼𝗿𝗶𝗻𝗴: Both the 𝗼𝘂𝘁𝗳𝗶𝘁 (𝗲𝘅𝗰𝗲𝗽𝘁 𝘁𝗵𝗲 𝗴𝗹𝗼𝘃𝗲𝘀 𝗮𝗻𝗱 𝗻𝗮𝗶𝗹𝘀) and 𝗺𝗮𝘀𝗸 can be 𝗿𝗲𝗰𝗼𝗹𝗼𝗿𝗲𝗱 𝗼𝗿 𝗰𝗼𝗹𝗼𝗿 𝗰𝗮𝗹𝗶𝗯𝗿𝗮𝘁𝗲𝗱 to fit your desired color palette—make them match your superhero theme perfectly! 🎨
𝙏𝙝𝙚𝙢𝙚 𝙄𝙣𝙨𝙥𝙞𝙧𝙖𝙩𝙞𝙤𝙣 🌌
This model is inspired by modern superhero aesthetics—bold, confident, and agile. It’s perfect for characters who embody strength, elegance, and individuality in their adventures! 🦸♂️
𝗥𝗲𝗮𝗱𝘆 𝘁𝗼 𝘁𝗮𝗸𝗲 𝗼𝗻 𝘁𝗵𝗲 𝘃𝗶𝗿𝘁𝘂𝗮𝗹 𝘄𝗼𝗿𝗹𝗱? 💪🎮
Detailed Instructions for Recalibrating Colors in VRoid for Face Paint 🎨
Recalibrating colors for face paint in VRoid Studio allows you to adjust and customize textures to achieve the perfect look for your model. Follow these steps to recalibrate face paint colors effectively:
Step 1: Access the Face Paint Editor
Open VRoid Studio and select your model.
Navigate to the Face panel in the top menu.
From the categories on the left-hand side, select Face Paint.
Step 2: Enable Color Calibration
In the Texture Editor, locate the checkbox labeled Apply color when editing and ensure it is checked.
Click Edit Texture to open the texture editing panel.
Check Use Color Calibration in the settings.
Step 3: Choose a Base Color
Use the Color Picker or Color Wheel on the right-hand panel to select your desired base color.
The color you choose will apply directly to the areas of the texture you paint.
Step 4: Paint and Adjust
Use brushes to paint directly on the model (left viewport) or on the UV texture map (right viewport).
You can toggle between these views for precision.
Adjust brush size and opacity as needed for detailed work.
Blend colors by layering multiple shades or using gradient effects.
Step 5: Refine with Layers
Add new layers for additional details or patterns by clicking Add Layer in the layers panel.
Right-click on layers for options like duplicating, renaming, or toggling visibility.
Use tools like Alpha Lock to preserve transparency while painting finer details.
Step 6: Save as a Custom Item
Once satisfied with your adjustments, save your work as a Custom Item.
This ensures you can reuse and tweak your face paint colors anytime.
Tips for Advanced Customization
Utilize grayscale textures with Overlay mode for smoother blending of colors.
Experiment with gradient maps to create light, medium, and dark variations of your chosen color.
For precise edits, consider exporting your texture as a PNG file and refining it in external software like Photoshop before re-importing it into VRoid Studio.
By following these steps, you can recalibrate and customize face paint colors to match your creative vision perfectly! 🎨
Detailed Instructions for Changing Shader Colors in VRoid for Clothes 🎨
Customizing shader colors for clothing in VRoid Studio allows you to create unique designs and adjust the appearance of your outfit textures. Follow these step-by-step instructions to change shader colors effectively:
Step 1: Open the Clothing Editor
Launch VRoid Studio and select your model.
Navigate to the Outfit tab from the left-hand menu.
Choose the clothing item you want to edit (e.g., top, bottoms, shoes).
Step 2: Access the Texture Editor
Click on Edit Texture located in the top-right corner of the screen.
This will open the Texture Editing Panel, where you can customize the clothing’s texture and colors.
Step 3: Adjust Base and Shade Colors
In the Texture Editing Panel, locate the Base Color and Shade Color options on the left-hand side.
Base Color: This is the primary color of your clothing item.
Shade Color: This adjusts the shadows and darker areas of your clothing texture.
Use the Color Picker or Color Wheel to select new colors for both options.
Step 4: Paint Directly on Clothes
Switch to Brush Mode to paint directly on your model or UV map:
Select a brush shape (circle, rectangle, spray paint, etc.) from the brush options.
Adjust brush size and opacity using sliders under Brush Parameters.
Begin painting over your clothing texture to apply new colors or patterns.
Step 5: Use Layers for Precision
Add new layers by clicking Add Layer in the layers panel.
Layers allow you to experiment with different designs without affecting your base texture.
Use tools like Alpha Lock to ensure only painted areas are affected when adding details.
Step 6: Save Your Changes
Once satisfied with your edits, save your work as a Custom Item.
This ensures you can reuse your newly designed clothing item across different models.
Advanced Tips for Shader Customization
Overlay Mode: Use Overlay mode for blending grayscale textures with colors for smoother transitions between light and dark areas.
Gradient Maps: Export textures into external software (e.g., Photoshop or Clip Studio Paint) to apply gradient maps for advanced shading effects before re-importing them into VRoid Studio.
Mirroring Tool: Activate the mirroring tool to paint symmetrical designs on both sides of clothing items.
By following these steps, you can recalibrate shader colors and create stunning custom outfits in VRoid Studio! 🎨
How to Edit Hair Textures, Colors, Adjust Custom VRoid Hair Parts in VRoid Studio, and Rig Hair for Movement ✂️✨
!!! Open the Hair Editor !!!!
1. Launch VRoid Studio and load your avatar.
2. Navigate to the **"Hair Editor"** tab from the menu on the left.
---
!!!! Edit Hair Textures !!!!
1. Select the hair group or part you want to edit (e.g., bangs, back hair, or accessories like ribbons).
2. Go to the **"Texture"** section in the editor.
3. Click on the texture thumbnail to open the texture editing window.
4. Use the built-in painting tools or import a custom texture by clicking **"Import Image"**.
5. Apply changes and save.
---
!!!! Change Hair Colors !!!!
1. In the **"Material"** section of the Hair Editor, locate the color settings.
2. Adjust the **Base Color** using the color picker or input specific RGB/HEX values.
3. Fine-tune highlights, shadows, and glossiness for a more realistic or stylized effect.
4. Save your changes.
---
!!!! Adjust Custom Hair Parts !!!!
1. Select the custom hair part you want to modify (e.g., buns, ribbons, or strands).
2. Use the following tools:
- **Move Tool:** Drag the part to reposition it around the head.
- **Scale Tool:** Resize the hair part to better fit your avatar’s proportions.
- **Rotate Tool:** Adjust angles for a natural look.
3. For more precision, tweak parameters like length, thickness, and curve in the **Hair Parameters** panel.
---
!!!! Test and Save !!!!
1. Rotate your avatar preview to ensure all adjustments look good from every angle.
2. Save your project once satisfied with your edits.
---
!!!! Rig Hair for Movement !!!!
1. **Add Bones:**
- In the Hair Editor, select a hair strand or group you want to rig.
- Click on the **"Bone Settings"** option in the editor panel.
- Enable bones for that hair strand by clicking "Add Bone."
2. **Adjust Bone Count:**
- Increase or decrease the number of bones depending on how much flexibility you want (e.g., longer strands may need more bones for smoother movement).
3. **Test Rigging:**
- Use the preview window to test how hair moves when bones are applied.
- Adjust bone placement and weight settings for natural motion.
4. **Save Changes:**
- Once satisfied with your rigging setup, save your project.
---
With these steps, you can fully customize your VRoid avatar's hairstyle for a polished and unique look! 🌟
How to Import Custom VRoid Hair Parts into VRoid Studio ✨
Follow these simple steps to import custom hair parts, such as the one shown in the images, into VRoid Studio:
---
### 1. Locate and Download the Custom Hair File
- Ensure the custom hair file is in `.customvroiditem` format or a compatible hair preset file.
- Save the file to an easily accessible folder on your computer.
---
### 2. Open VRoid Studio
- Launch VRoid Studio and either create a new avatar or open an existing one.
---
### 3. Import the Custom Hair Part
1. Navigate to the **"Hair Editor"** tab in VRoid Studio.
2. Look for the **"Import"** button, typically located in the custom items section.
3. Click "Import" and browse your computer for the `.customvroiditem` file.
4. Select the file and confirm the import. The custom hair part will now appear in your list of available hair presets.
---
### 4. Apply and Adjust the Hair
1. Select the imported hair part from your presets.
2. Apply it to your avatar's hairstyle.
3. Use VRoid Studio’s tools to adjust:
- **Position:** Move or scale the hair to fit your avatar’s head shape perfectly.
- **Bones:** If the hair part includes pre-set bones (like in this example), ensure they are properly aligned for natural movement.
---
### 5. Save Your Avatar
- Once satisfied with the adjustments, save your avatar with the new hairstyle.
- Export it as a `.vrm` file if you plan to use it in Unity or VRChat.
---
### **Key Features of Custom Hair Parts**
- **Dynamic Ribbon Movement:** If your custom hair includes ribbons, they may move naturally with head motion, adding realism and style.
- **Pre-Set Bones:** Many custom hairs come with rigged bones for bangs or other parts, ensuring smooth animation and expressiveness.
Quick Instructions to Import .vroidcustom Items into VRoid Studio
1. **Open VRoid Studio:**
- Launch the app and open your avatar project.
2. **Navigate to the Custom Item Importer:**
- Go to the "Clothing Editor" or relevant customization tab.
3. **Import the .vroidcustom File:**
- Click the **"Import"** button and select the `.vroidcustom` file from your computer.
4. **Apply the Item:**
- Once imported, the custom item will appear in your clothing list. Select it to apply it to your avatar.
5. **Adjust as Needed:**
- Use VRoid's sliders or tools to tweak the fit or positioning of the item.
6. **Save Your Avatar:**
- Save your changes or export your avatar with the new custom item.
💡 *Tip:* Ensure you have compatible VRoid Studio versions to avoid import issues!
To use .customvroiditem files for VRChat avatars, follow these detailed instructions:
## 1. Prepare Your VRoid Studio Avatar
1. Open VRoid Studio and create or load your base avatar.
2. Ensure your avatar is fully designed and ready for customization.
## 2. Import .customvroiditem Files
1. In VRoid Studio, locate the "Import" option in the main menu.
2. Select the .customvroiditem file you want to use.
3. The custom item will appear in your VRoid Studio inventory.
## 3. Apply Custom Items to Your Avatar
1. Navigate to the appropriate section in VRoid Studio (e.g., Clothing, Accessories).
2. Find the imported custom item in your inventory.
3. Click on the item to apply it to your avatar.
4. Adjust the item's position, size, and other properties as needed.
## 4. Export Your Avatar
1. Once satisfied with the customizations, export your avatar as a .vrm file.
2. Save the .vrm file in an easily accessible location.
## 5. Set Up Unity and VRChat SDK
1. Install Unity 2022.3.22f1 (the version compatible with current VRChat SDK)[4].
2. Download and install the VRChat Creator Companion (VCC)[4].
3. Use VCC to create a new VRChat avatar project[4].
## 6. Import VRM Converter for VRChat
1. In your Unity project, go to the Package Manager.
2. Search for and import the "VRM Converter for VRChat" package[4][5].
## 7. Convert Your VRoid Avatar
1. In Unity, navigate to "VRM0" in the top menu.
2. Click "Import" and select your .vrm file.
3. Once imported, select your avatar in the Project window.
4. Go back to "VRM0" and click "Duplicate and Convert for VRChat"[4].
5. Save the converted avatar when prompted.
## 8. Configure Avatar Settings
1. Select your converted avatar in the Hierarchy window.
2. In the Inspector, locate the "VRC Avatar Descriptor" component.
3. Adjust the View Position to align with your avatar's eyes[7].
4. Configure any other necessary VRChat-specific settings.
## 9. Upload Your Avatar
1. Open the VRChat SDK Control Panel in Unity.
2. Ensure all required components are set up correctly.
3. Click "Build & Publish" in the control panel[1].
4. Name your avatar and complete the upload process.
## Additional Tips
- If you need to make further adjustments to custom items, use the Unity Editor expansion pack to modify model data and costume data[2].
- Utilize the fitting feature in VRoid Studio to adjust costumes for different body types[2].
Terms of Service
Please carefully review the terms of service below before purchasing. By purchasing, you agree to these terms:
𝗨𝘀𝗮𝗴𝗲 𝗥𝗶𝗴𝗵𝘁𝘀
Personal Commercial Use: Allowed for a single owner per purchase.
One Purchase, One Owner: Each purchase grants usage rights to one individual for most commercial purposes.
𝗖𝗿𝗲𝗱𝗶𝘁
Not Required but Appreciated: While crediting the creator (LadyLuck/LadyEstellaRose) is not mandatory, it is always appreciated when possible!
𝗔𝗹𝗹𝗼𝘄𝗲𝗱 𝗨𝘀𝗲𝘀
✅ Streaming: Use the product on a model while streaming on platforms like Twitch or YouTube Live.
✅ YouTube Content: Feature the product on a model in videos for YouTube or other video-sharing platforms.
✅ VRChat Play & Private Use: Use the product on a model for personal VRChat avatars and private use.
✅ Alterations for Personal Use: Modify or alter the product to better suit your personal needs on a model.
𝗣𝗿𝗼𝗵𝗶𝗯𝗶𝘁𝗲𝗱 𝗨𝘀𝗲𝘀
🚫 Reselling: You may not resell the product, whether altered or unaltered.
🚫 False Attribution: Do not claim that you or anyone else created the product. Credit must remain with the original creator, LadyLuck/LadyEstellaRose.
🚫 Redistribution Without Purchase: Sharing or redistributing the product to others for commercial use without purchase is strictly prohibited.
🚫 Public Access Models: Do not make models with this product publicly downloadable, including public VRChat avatars or VRoid Hub models.
🚫 Immoral or Slanderous Use: The product may not be used for any purpose that harms others or promotes slanderous behavior.
𝗢𝘄𝗻𝗲𝗿𝘀𝗵𝗶𝗽 𝗮𝗻𝗱 𝗥𝗲𝗳𝘂𝗻𝗱 𝗣𝗼𝗹𝗶𝗰𝘆
All rights to the products sold remain with AureliaBoutique/LadyEstellaRose.
No Refunds: Due to the digital nature of these products, refunds are not available after purchase.
𝗖𝗼𝗻𝘁𝗮𝗰𝘁 𝗜𝗻𝗳𝗼𝗿𝗺𝗮𝘁𝗶𝗼𝗻
If you have any questions or need assistance, feel free to reach out! I’m happy to help with custom VRoid fashion tailored just for you.
📱 Cluster & LINE Messaging Username: AureliaBoutique / LadyEstellaRose
𝙏𝙝𝙖𝙣𝙠 𝙮𝙤𝙪 𝙛𝙤𝙧 𝙨𝙪𝙥𝙥𝙤𝙧𝙩𝙞𝙣𝙜 𝙢𝙮 𝙬𝙤𝙧𝙠 𝙖𝙣𝙙 𝙧𝙚𝙨𝙥𝙚𝙘𝙩𝙞𝙣𝙜 𝙩𝙝𝙚𝙨𝙚 𝙩𝙚𝙧𝙢𝙨! 💖
𝗡𝗲𝗲𝗱 𝗛𝗲𝗹𝗽? 𝗛𝗲𝗿𝗲’𝘀 𝗛𝗼𝘄 𝘁𝗼 𝗥𝗲𝗮𝗰𝗵 𝗢𝘂𝘁! 😊
If you’re experiencing any issues with my VRoid products, don’t worry—I’m here to help! To make the process as smooth as possible, please follow the steps below when contacting me:
1. Share a Screenshot 📸
Please include a clear screenshot of the part of the product you’re having trouble with in VRoid Studio.
Let me know what you’re trying to accomplish so I can better understand the issue.
2. Tell Me What You’ve Tried 🛠️
Let me know the steps you’ve already taken to try and fix the problem. This helps me avoid suggesting things you’ve already done!
3. Be Patient While I Fix It 🕒
If it turns out the issue is something I need to fix on my end, I’ll get to work right away.
Please allow 2-3 business days for me to send you a repaired file.
Feel free to reach out anytime—I’m happy to assist and ensure your experience with my products is as enjoyable as possible! 💖
모든 리뷰
더보기리뷰 등록
리뷰를 작성하려면 로그인이 필요합니다.
로그인하고 리뷰 쓰기